|
|
User's Guide: Avails Validator Release
1.1
Contents:
- Overview
- Functionality
- User Interface
- Using the Validator
- Selecting Processing Options
- Running the Validator and Interpreting Output
- Editing XML
- Overview
- Launching the Editor
- User Interface
- Saving Changes and Re-Validating
- Format Conversion
- Overview
- Converting XML to XLSX
- Converting XLSX to XML
- User Interface
- Running Scripts
- Functionality
- Writing Command Scripts
- User Interface
1) Overview
1.1) Functionality
The
Validator
is a standalone application that is intended to be used during the pre-processing of an Avails Metadata file.
Capabilities include:
- Validates that one or more Avails files are in conformance with the Avails
specification.
- Validation of Avails file in either XML or XLSX format.
- Optional checks for conformance with applicable best practices or similar
guidance.
- Integrated XML Editor with linkage to any errors or warnings detected.
- Conversion of XLSX formatted Avails into XML.
- Conversion of XML formatted Avails into XLSX.
- Ability to run in a scripted mode for batch processing of multiple files.
- Installers for Windows, Mac OSX, and Linux platforms.
1.2) User Interface
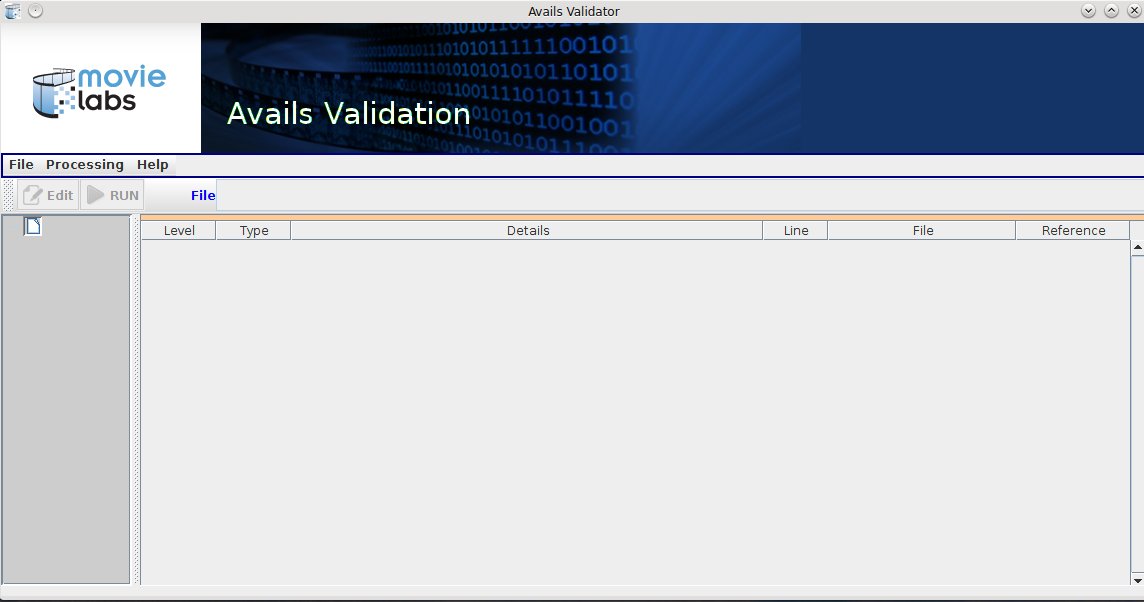
Figure 1: Validator UI
The user interface is shown in Figure 1. From top to bottom, the main components are:
- Menus providing access to generic capabilities. The primary one is the "Processing"
menu. This allows the user to select the types of validation checks to be performed and the
level of logging output desired.
- The Tool Bar, which is used for:
- selection of one or more files to be validated, and
- access to the integrated Manifest Editor.
- The Logging panel used to display and filter the messages resulting from the validation
process
2) Using the Validator
2.1) Selecting Processing Options
- The first step is to configure basic options and preferences (e.g., logging output).
This is done via the check boxes in the Processing menu (Fig 2). The user may:
- filter validation-related messages based on their severity and
- enable or disable informational and status messages.
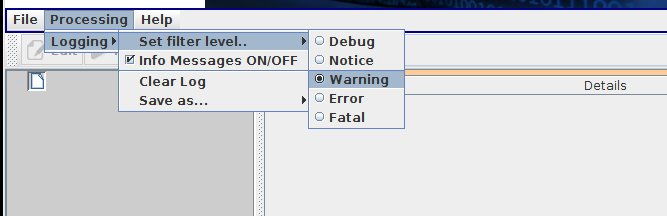
Figure 2: Validation Criteria Menu
- The next step is to select which files will be validated. There are three mechanisms
provided:
- Use the Open File... menu item to select an Avails file in either XML or
Excel format:
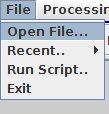
- The Recent.. menu item may be used to select from a history of recently
accessed files.
- A left-click on the 'File' text area (to the right of the
 button)
will pop open a File Chooser dialog. button)
will pop open a File Chooser dialog.
If a directory is selected, all Avails files found in the directory will be processed.
Alternatively a single file may be selected. Note, however, that if the selected source is
a directory containing multiple Avails files, then all files will be validated against the
same set of options.
2.2) Running the Validator and Interpreting Output
Once all validation options have been set, the validation process may be executed via the
RUN
button. When the validation process completes, the results will be displayed in the Logging
panel (see Figure 3).

Figure 3: Validation Results
The navigation pane on the left side allows the user to select a sub-set of messages to
be displayed on the right side. Messages are hierarchically grouped first by the Avails file
they apply to, then by the severity level, and finally by the type of validation check resulting
in the message (e.g., CMD). The levels, in order of decreasing severity, are:
-
Fatal
: Indicates the inability to perform any processing on a file. For example, attempting to
process an Avails based on an unsupported version of the schema would result in a FATAL
log entry.
-
Error
: a problem that must be corrected. An example would be the absence of a required property
or the use of an unrecognized value for an enumerated type (e.g., an invalid language
code)
-
Warning
: a problem or inconsistency that does not have to be corrected but may be worth looking
into. For example, a Transaction with more than one SuppressionLiftDate terms is
contradictory but may still be processable by a retailer.
-
Notice
: indicates that a recommended Best practice was not followed (e.g. the use of
non-EIDR ID values for IDs)
-
Debug
: diagnostic output that should only be produced when requested by Movie Labs.
The last type of log entry is an
Info
message. These are used to provide a user with summary and status information about the file
being validated. The generation of Info messages may be enabled or disabled via the
Processing -> Logging
menu (see Fig 2 above).
Icons are used to indicate the most severe problem found in any branch of the message
hierarchy. For example, Figure 3b shows that only one of the two files that were processed
contains errors.
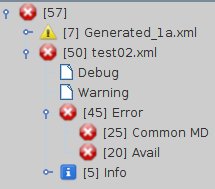
Figure 3b: Severity of Log Messages
The message display pane on the right provides a table showing all the messages in which
ever branch of the message hierarchy has been selected in the navigation pane. Some log messages
will provide additional information via tool tips. Where possible, this will include
references to specific sections of the documentation that cover the identified problem.
The interpretation of the
Line
entry will depend on the type of Avails file being processed. For XML files it will be the line
number in the file while for XLSX files it is actually the row number in the sheet being
processed.
The displayed log messages may be sorted by means of a left-click on any of the column
headers. Subsequent left-clicks will reverse the sort order.
By right-clicking on the message display pane, a pop-up menu may be accessed (see Figure
4). Available actions are:
- show the XML associated with the error in an Editor window [for XML-formatted Avails
files only],
- clear the entire contents of the message log, or
- save to a file the currently displayed group of messages in CSV format
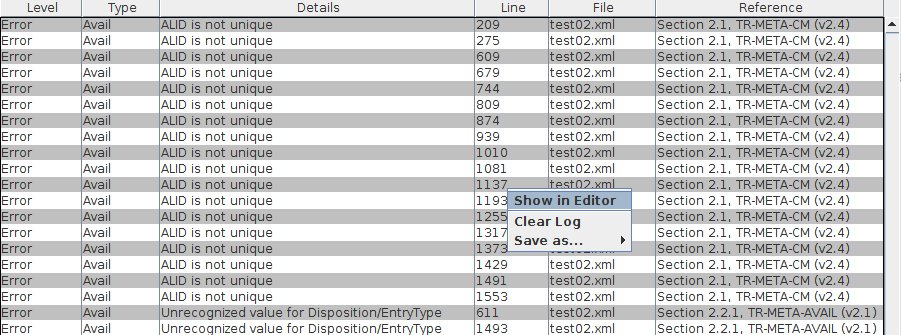
Figure 4: Message Log Pop-up Menu
The saving and/or clearing of the log file are simple operations and the user interface for
both of these is self-explanatory. Usage of the Editor is covered in detail in the next section.
2.3) Editing [XML files only]
2.3.1) Overview
The Avails Validator includes a built-in XML Editor that may be used to correct any errors found
during the validation process. Note that this is not intended to provide a full-featured XML
authoring capability similar to those provided by tools such as XML Spy or Oxygen-XML. Rather it is
focused on providing an easy-to-use and integrated capability for quickly correcting errors and
then re-running the validation tests.
The Editor UI is implemented as a separate window (see Figure 5). Multiple Editor windows
may be opened at the same time, with each displaying a different XML file. Note, however, that
there may only be one Editor window for any given file.
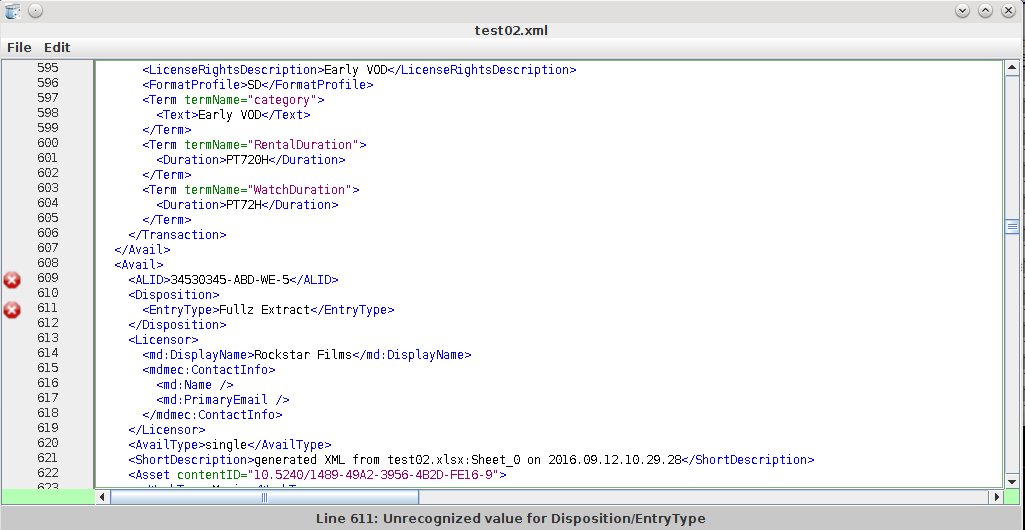
Figure 5: XML Editor
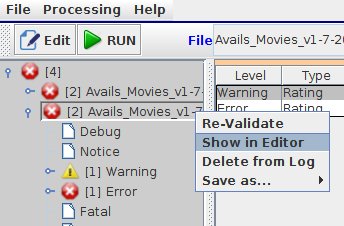
2.3.2) Launching the Editor
There are three ways to launch the XML Editor:
- As described in Section 2..2, an Editor may be launched by the context menu displayed
when the user right-clicks on a log entry.

The editor will scroll the display to the line associated
with the log entry.
- An Editor may be launched by right-clicking on the file name displayed in the navigation
pane:
 . .
- An Editor may also be launched using the EDIT button in the tool bar:

When an editor is launched for a specific Avails file:
- if an editor window for the file has not been previously accessed, a new Editor will
be created and displayed.
- if an editor for the file already exists but has been minimized (i.e., iconified) by
the user, it will be opened and brought to the foreground.
- if an editor for the file already exists, it will scroll to display the selected
line in that file.
- if the log message used to access the editor does not have a specific location
associated with it, or the editor was launched using the Menu Bar, the current line will
be set to the first line in the file.
2.3.3) User Interface
The Editor window has the following components:
- a text pane which uses colors for syntax highlighting,
- a menu bar providing access to the available editing functions
- line numbers displayed on the left edge that includes markers indicating errors and
warnings, and
- display of status messages across the bottom of the editor window.
These are shown in Figure 6.
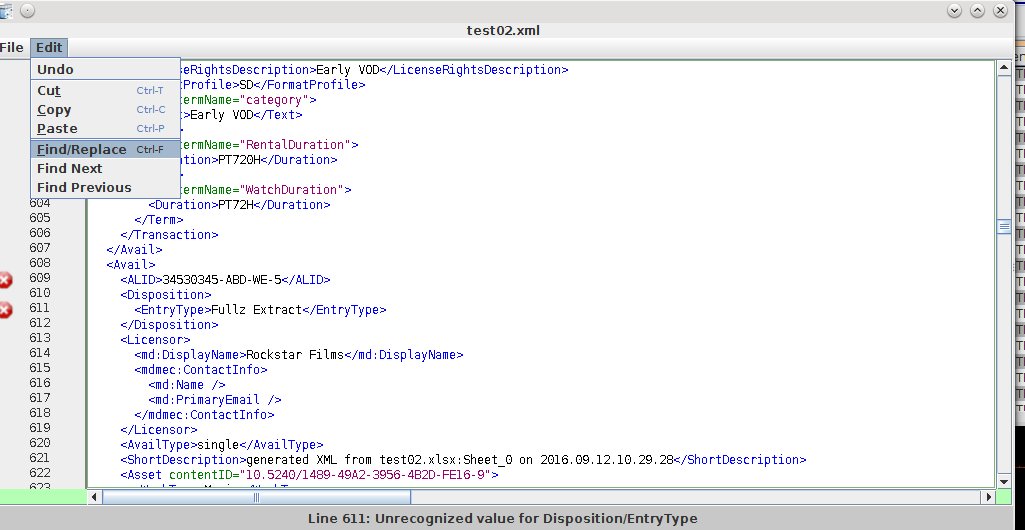
Figure 6: Editor UI
The status messages are linked to the marker icons displayed along side the line numbers. A
single left or right click on a marker will result in the associated log entry being displayed
in the status panel.
2.3.4) Saving Changes and Re-Validating
To save changes, simply use either the pull down menu or the
<Ctrl>S
shortcut. Once the Avails file has been saved the XML may be re-validated.
The changed Avails may also be saved under a new name using the
Save As
menu option. If the Avails is saved under a new name then the user must explicitly identify the
new Avails file as the Validator's
Source
before it can be validated. Also it is important to remember that the existing Editor
window will still be displaying the original Avails file. In order to edit the newly saved file,
the user must:
- select the new file as the source file to validate,
- run the validation, and then
- select one of the resulting log messages to open an Editor window for the new XML
file.
3) Format Conversion
3.1) Overview
The Avails Validator provides a translation capability that may be used to convert an
Avails file from one format to another. The current version of the software supports the
following conversions:
- from XML (v2.1 or v2.2) to XLSX v1.7
- from XLSX (v1.6 or v1.7) to XML v2.2
- from XLSX v1.6 to XLSX v1.7
Regardless of the specific conversion being performed, the following guidelines apply:
- An Avails file must be valid before it can be translated. The Validator UI
will disable the Translate option for any file that contains validation errors or
has yet to be validated.
- Any Avails file generated by the Translation function should be validated
before using. Translation is a best effort capability. Due to inconsistencies when
translating between different formats (e.g. XML to Excel) or different versions of the
same format (e.g., Excel 1.6 to Excel 1.7) the translated Avails may not be valid even
though the original Avails file was.
The following sections provide more detailed guidance for specific conversions.
3.2) Converting XML to Excel
The Excel format requires the Avails to be organized by
Asset/WorkType
in that the contents of a spreadsheet will consist entirely of Movie-related or TV-related
Avails. The conversion process will, therefore, generate for each XML document a single Excel
workbook containing exactly two spreadsheet: one for movies and one for TV. Note, however, that
the Excel standard for Avails requires a workbook to contain a single sheet. The user is
responsible for splitting the generated Excel file into two separate workbooks with one
spreadsheet each.
The Avails XML schema supports all of the capabilities and constructs defined by the EMA
Avails Metadata standards. In contrast, the semantics supported by the Excel version of an
Avails are very limited. As a result, information present in an XML file may not be supportable
in an Excel file.
Not all XML Avails will, therefore, be supportable as an Excel file. The following
limitations should be considered when converting XML Avails to the v1.7 Excel Avail format:
Avail:
- Avail/Disposition/IssueData is not supported by the Excel format and will be
dropped.
-
Avail/Licensor/Display
is the only Licensor-related data supported by the Excel format. Other attributes and
properties (e.g., contact information) will be dropped. The same limitation applies to
Avail/ServiceProvider
- The Avail/ShortDescription field is not supported by the Excel format and will
be dropped.
Asset:
- The Excel format limits an Avail to a single Asset. Any additional Asset
elements will be dropped.
- The Excel format will only support a sub-set of WorkTypes.
- For TV-related Avails, the Excel format will only allow a standard series >
season > episode structure. It does not support mini-series, collections, or volumes.
The WorkType must be either Episode or Season.
- A Movie-related Avails is restricted to Assets with a WorkType of Movie,
Short, or Collection.
Any Asset with a WorkType not listed above will be dropped.
- In Excel, a BundledAsset is only allowed when the parent Asset has a
WorkType of Collection. Multiple BundledAssets are supported.
However, only the BundledALID field is preserved during translation. All other
information, such as SharedEntitlements, is lost.
Asset Metadata:
- VersionDescription is not supported by Excel.
- The ReleaseDate data in Excel is limited to just the year. Month and day
fields are dropped when converting.
- The Excel format only supports a subset of the ReleaseHistory information
available via the XML format:
- The only ReleaseTypes supported are 'original' and 'DVD'.
- The DistrTerritory, Description, and ReleaseOrg will
be dropped.
- XML allows multiple Rating elements but Excel is limited to a single Rating.
- The Rating/Region data in the XML is dropped. The Excel structure assumes
that the Rating/Region is the same as the Transaction/Territory.
Transaction
- The Excel format limits an Avail to a single Transaction. Any additional Transaction
elements will be dropped.
- Territory is optional for an XML Transaction but is required for
Excel.
- An XML Transaction may specify multiple Territory elements. The Excel
format, however, restricts a Transaction to a single Territory.
- TerritoryExcluded is not supported in Excel.
- An XML Transaction may specify multiple AssetLanguage elements. The
Excel format, however, restricts a Transaction to a single AssetLanguage.
- The following Transaction-related fields are not supported in Excel:
- RefALID
- ExperienceCondition
- OtherInstructions
- An Excel Transaction must have exactly one Term of the
following type:
WSP
,
DMRP
,
SMRP
,
Tier
,
LicenseFee
,
Category
, or the
TPR-
form of one of the other allowed
termNames
.
- An Excel Transaction may have exactly one SRP Term
3.3) Converting Excel to XML
The Avails Validator can translate an Excel Avails file based on either v1.6 or v1.7 of the
template into an XML Avails. The process is fairly simple as the XML format will support any
Avails structure that can be specified via Excel. The sole issue is that an XML Avail requires a
ShortDescription
which is absent from the Excel version. The translator will therefore create a description that
indicates the XLSX file and worksheet that the XML was generated along with a timestamp. The
full syntax is:
generated XML from {file-name}:Sheet_n on yyyy.mm.dd.hh.mm.ss
3.4) User Interface
To translate a file:
First validate the file using the normal mechanisms. Correct any errors
identified. Open the pop-up menu via a right-click on the file name displayed in the
navigation pane:
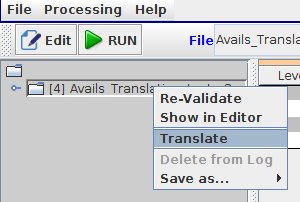
Figure 7: File Context Pop-up Menu
If all validation errors have been corrected, the 'Translate' action will be
enabled.
Selecting '
Translate
' will result in the display of the Avails Translation Dialog:
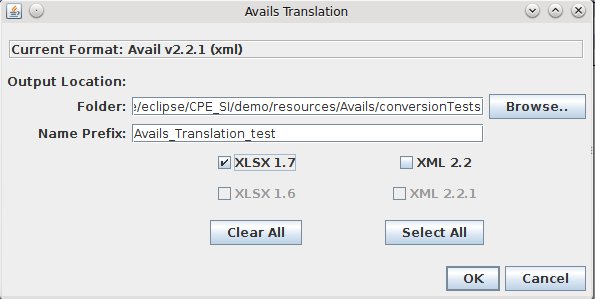
Figure 8: Avails Translation Dialog
The checkboxes should be used to select one or more output formats. A checkbox will be
disabled if the software does not support conversion from the input format to that particular
output format.
Output files will saved to the indicated folder. The
Name Prefix
will be concatenated with the Avails version to create the file name. For example, the
settings shown in Fig 8 will produce a single output file with the name
Avails_Translation_test_v1.7.xlsx
.
The translator will log any changes it makes to the Avail specifications as a result of limitations
in the conversion process (see Sections 3.2 and 3.3). Figure 9 shows an example output:

Figure 9: Avails Translation Log Report
4) Running Scripts
4.1) Functionality
Validation of multiple Avails files may be performed using scripts that can specify any of
same options and settings available thru the user interface. A script may easily be used to
process a set of manifests with specified sub-sets being handled using different options. All
results are automatically displayed in the GUI's log display but the script engine supports the
option of also writing the log to a file.
4.2) Writing Command Scripts
4.2.1) Structure
A script file is written using the JSON
syntax. The structure for a validation script is as follows:
- Command: should be specified as validate . The validation command has OPTIONAL
sub-elements followed by a list of files to process.
4.2.2) Examples
The following is an example of script that validates two files plus any additional Avails
found in a specific folder and then saves the message log in a single output file:
{
  "validate":{
    "pathPrefix":"./AvailsDemos/",
    "logging":{
      "level":"Warning",
      "output":"./scriptLog01.xml"
      },
    "avails":[
      {
        "file":"si_tests/CMM_BBB_v0.1.xml"
      },
      {
        "file":"si_tests/CMM_Sita_v0.1.xml"
      },
      {
        "file":"studioFoo"
      }
      ]
    }
}
The next two examples illustrate the use, or non-use, of the
pathPrefix
. In the first example, all relative paths are resolved using the present working directory as
the base. Both
foo1.xml
and
foo2.xml
should therefore be in the
pwd
.
{
  "validate":{
    "avails":[
      {
        "file":"foo1.xml"
      },
      {
        "file":"./foo2.xml"
      },
      {
        "file":"/foo3.xml"
      }
    ]
  }
}
In the next example,
foo1.xml
and
foo2.xml
are still co-located but are now in in a sub-directory of the directory containing the script
file.
foo3.xml
should still be in the same location as the previous examples since it is specified using an
absolute path.
{
  "validate":{
    "pathPrefix":"./AvailsDemos/",
    "avails":[
      {
        "file":"foo1.xml"
      },
      {
        "file":"./foo2.xml"
      },
      {
        "file":"/foo3.xml"
      }
    ]
  }
}
4.3) User Interface
Selection and execution of a script is via the
Run Script..
menu entry. Script files are not selectable using the
File
text-entry field used to specify an Avails XML file.
Once a script file has been selected the execution is automatic. It is recommended that the
contents of the log display be cleared prior to executing a script. Failure to do so will result
in any previous messages being included in the saved log file.
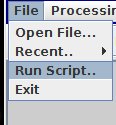
Figure 10: Script Selection and Execution
|